You can refresh your next handmade project with 16+ crochet granny square variations that look anything but boring, using bold colors, raised stitches, and playful centers. You get the cozy patchwork look that keeps these designs popular, with plenty of room to make each piece feel personal.
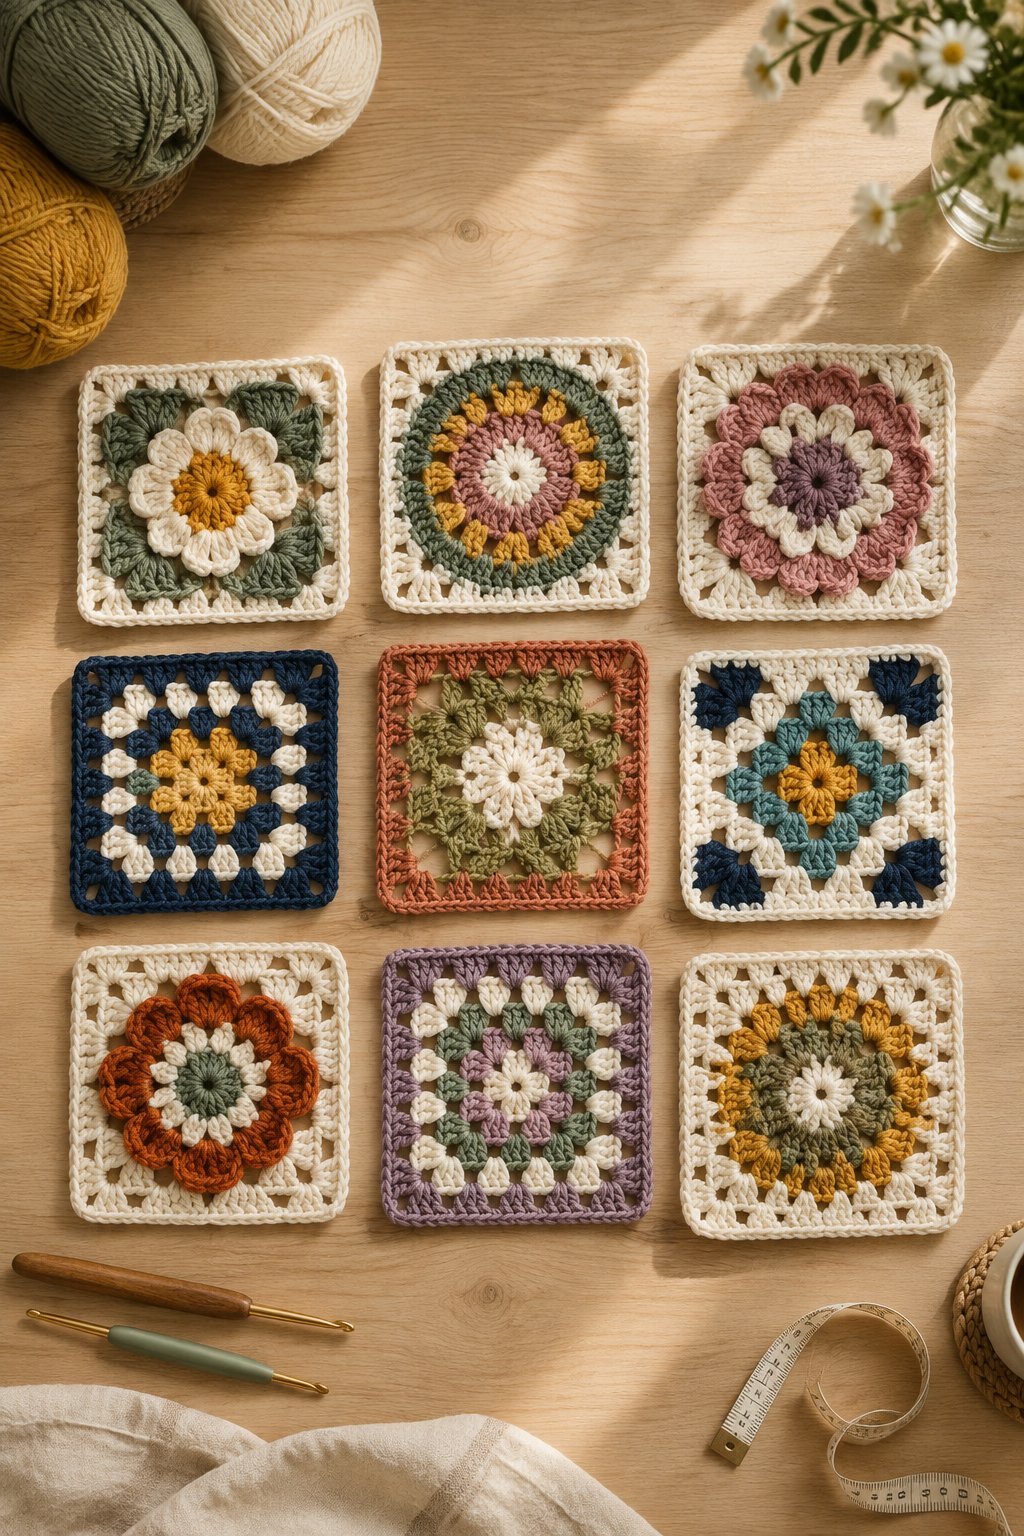
You’ll find approachable starting points alongside satisfying intermediate projects, whether you want a useful gift or something colorful for your home. Save your favorites with their yarn and hook notes, then follow a matching motif pattern for exact stitch counts. Treat the time estimates as rough active-making time for the suggested project; your pace and finished size will change them.
1) Sunburst Granny Square Tote

Your sunburst tote gets its cheerful shape from round, textured centers framed by crisp square borders. Try mustard centers with coral petals and cream edges, or build a softer palette around dusty blue.
Choose worsted-weight cotton and start with a 4 mm hook for firm fabric. You’ll work puff or cluster stitches around the center, then use taller stitches to form the corners. Follow a sunburst pattern closely, since its stitch placement controls how neatly the circle becomes square.
For an intermediate project, arrange your finished motifs into front and back panels before joining. Add a fabric lining to keep small belongings contained, and reinforce both handle attachment points. You’ll get a useful everyday bag with enough structure to show off those flowerlike centers. Keep the straps fairly short if you want less stretch under a loaded bag.
|
Detail |
Specification |
|---|---|
|
Yarn Weight |
Worsted, #4 cotton |
|
Skill Level |
Intermediate |
|
Estimated Time |
About 10–16 hours |
2) Solid Granny Square Checkerboard Blanket

You get a clean, graphic blanket when you alternate solid granny squares in two contrasting colors. Cream and forest green feel calm, while pink and burgundy give your checkerboard a warmer, playful finish.
Use worsted-weight acrylic with a 5 mm hook as your starting point. Your solid-square pattern will rely mainly on double crochet, with increases at each corner. Count every side carefully, especially if your pattern uses very small corner spaces.
This beginner-friendly choice suits a couch throw or housewarming gift. Try an eight-by-ten layout of 5-inch squares for a roughly 40-by-50-inch blanket before seams and edging. Keep each square one color so your checkerboard stays clear. A narrow border in the darker shade gives you a tidy frame without adding much visual weight. Photograph your layout before joining so you have a reliable placement guide.
|
Detail |
Specification |
|---|---|
|
Yarn Weight |
Worsted, #4 acrylic |
|
Skill Level |
Beginner |
|
Estimated Time |
About 25–40 hours |
3) Heart-Center Granny Square Pillow

Your heart-center pillow brings a sweet focal point to a reading chair or bed. Give the heart a clear outline with cherry red against blush, or choose lavender and cream for a quieter look.
Pick smooth worsted-weight yarn and a 4.5–5 mm hook. You’ll see the heart shape more clearly with a yarn that shows individual stitches. Follow a square pattern with an integrated heart, or securely sew a separate crochet heart onto a solid square.
You’ll find the appliqué approach easier, while a shaped heart worked into the square suits intermediate skills. Arrange four matching squares across the front of a small cushion, checking their combined size against your insert. Add a plain crochet back with an envelope opening for easier washing. Keep the heart’s top curves and lower point firmly attached so the motif stays neat through use.
|
Detail |
Specification |
|---|---|
|
Yarn Weight |
Worsted, #4 |
|
Skill Level |
Easy |
|
Estimated Time |
About 6–10 hours |
4) African Flower Granny Square Cardigan

Your African flower cardigan turns petal-shaped motifs into a wearable patchwork garden. A repeated cream border gives you a calm backdrop for changing flower colors, especially with sage and rose shades.
Choose a square-adapted African flower pattern, since many familiar versions finish as hexagons. You’ll shape the petals with grouped stitches and define them with an outlining round. DK yarn with a 4 mm hook gives you a useful starting point for a lighter garment.
Treat this as an intermediate project and follow a cardigan layout with clear sizing instructions. Measure your blocked motif before making the full batch, then compare the planned chest width with a cardigan you enjoy wearing. Keep the underarm area flexible and check sleeve width before joining. For an easy-to-style finish, repeat your border color in the cuffs and front bands.
|
Detail |
Specification |
|---|---|
|
Yarn Weight |
DK, #3 |
|
Skill Level |
Intermediate |
|
Estimated Time |
About 30–50 hours |
5) Mitered Granny Square Baby Blanket
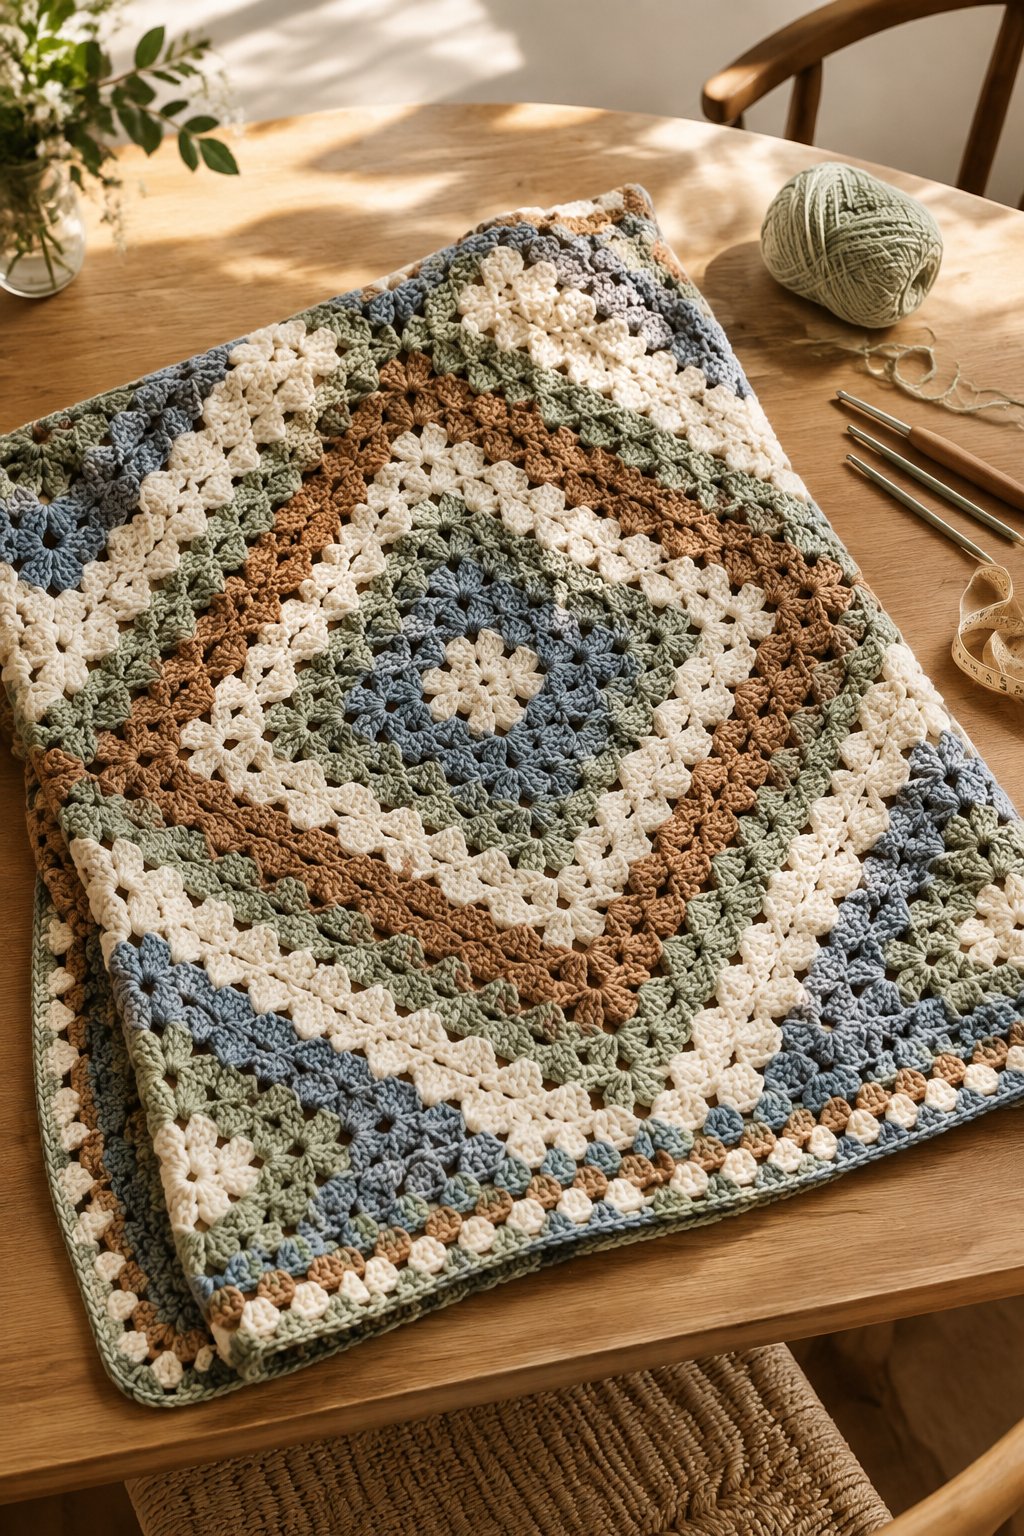
You create gentle movement in a mitered granny blanket by rotating squares with offset, angled color bands. Try butter yellow with cream, adding a muted peach stripe for a soft accent.
Choose washable DK yarn and begin with a 4 mm hook. Your pattern will build granny clusters along selected edges, creating the mitered effect. Mark the working corner so you keep each turn and increase in the correct place.
This easy project works well as a supervised tummy-time mat or stroller blanket. Lay out every square before assembly, rotating the bands into diamonds or zigzags. For a baby gift, weave in ends securely and skip fringe, buttons, or loosely attached decorations. Keep blankets outside an infant’s sleep space. Include the yarn’s washing instructions with your gift, especially if you combine several colors or different yarn brands.
|
Detail |
Specification |
|---|---|
|
Yarn Weight |
DK, #3 |
|
Skill Level |
Easy |
|
Estimated Time |
About 15–25 hours |
6) Willow Granny Square Table Runner

Your Willow square runner adds a lace-like layer while leaving some of your tabletop visible. Choose ivory for a classic look, or use muted terracotta to bring warmth to a plain dining space.
Smooth sport-weight cotton and a 3.5 mm hook give you a good starting combination. You’ll work a detailed center with open spaces and a defined square frame. Keep a stitch marker at the beginning of each round to help you track the pattern.
Plan this as an intermediate project, especially if you’re new to following several different rounds. Join one row of squares for a narrow runner, or use two rows for a wider centerpiece. Check the width against your table before making every motif. Keep decorative pieces on top cool and lightweight; use a proper heat-resistant trivet beneath hot cookware to protect your table.
|
Detail |
Specification |
|---|---|
|
Yarn Weight |
Sport, #2 cotton |
|
Skill Level |
Intermediate |
|
Estimated Time |
About 8–14 hours |
7) Popcorn Stitch Granny Square Cushion

You give a cushion a plush, sculpted surface when you arrange popcorn stitches in rings or flower shapes. A single oatmeal shade highlights the texture, while alternating pastel rounds create a playful candy-colored finish.
Use smooth worsted-weight yarn with a 5 mm hook to keep the raised stitches easy to see. To form a popcorn, you’ll work a group of stitches, remove your hook, and pull the final loop through the first stitch. Follow your pattern’s exact stitch count.
Your intermediate-level cushion will feel fuller than a flat granny design, so test one square before committing to the cover. Use textured squares on the front and a smooth back for comfortable support. Keep your popcorns facing outward during assembly. If you choose a zippered fabric backing, baste it in place first to check the fit around your insert.
|
Detail |
Specification |
|---|---|
|
Yarn Weight |
Worsted, #4 |
|
Skill Level |
Intermediate |
|
Estimated Time |
About 8–12 hours |
8) Two-Color Spiral Granny Square Bag

Your two-color spiral bag gets its energy from curved bands that seem to turn through each square. Choose teal and cream for clear contrast, or pair rust with pale pink for a softer swirl.
Start with worsted-weight cotton and a 4 mm hook. You’ll keep two working colors active in a spiral pattern, then shape the outside into a square. Secure each resting loop with a locking marker so you avoid pulling out stitches while switching colors.
This intermediate project rewards careful tracking of increases. Make two matching panels for a small crossbody bag, adding a narrow side strip if you want extra depth. Use a sewn lining to support the shape and protect the open stitch areas. Attach your strap through reinforced sections along the upper edges, spreading the load across several stitches on each side.
|
Detail |
Specification |
|---|---|
|
Yarn Weight |
Worsted, #4 cotton |
|
Skill Level |
Intermediate |
|
Estimated Time |
About 8–14 hours |
9) Stained Glass Granny Square Throw
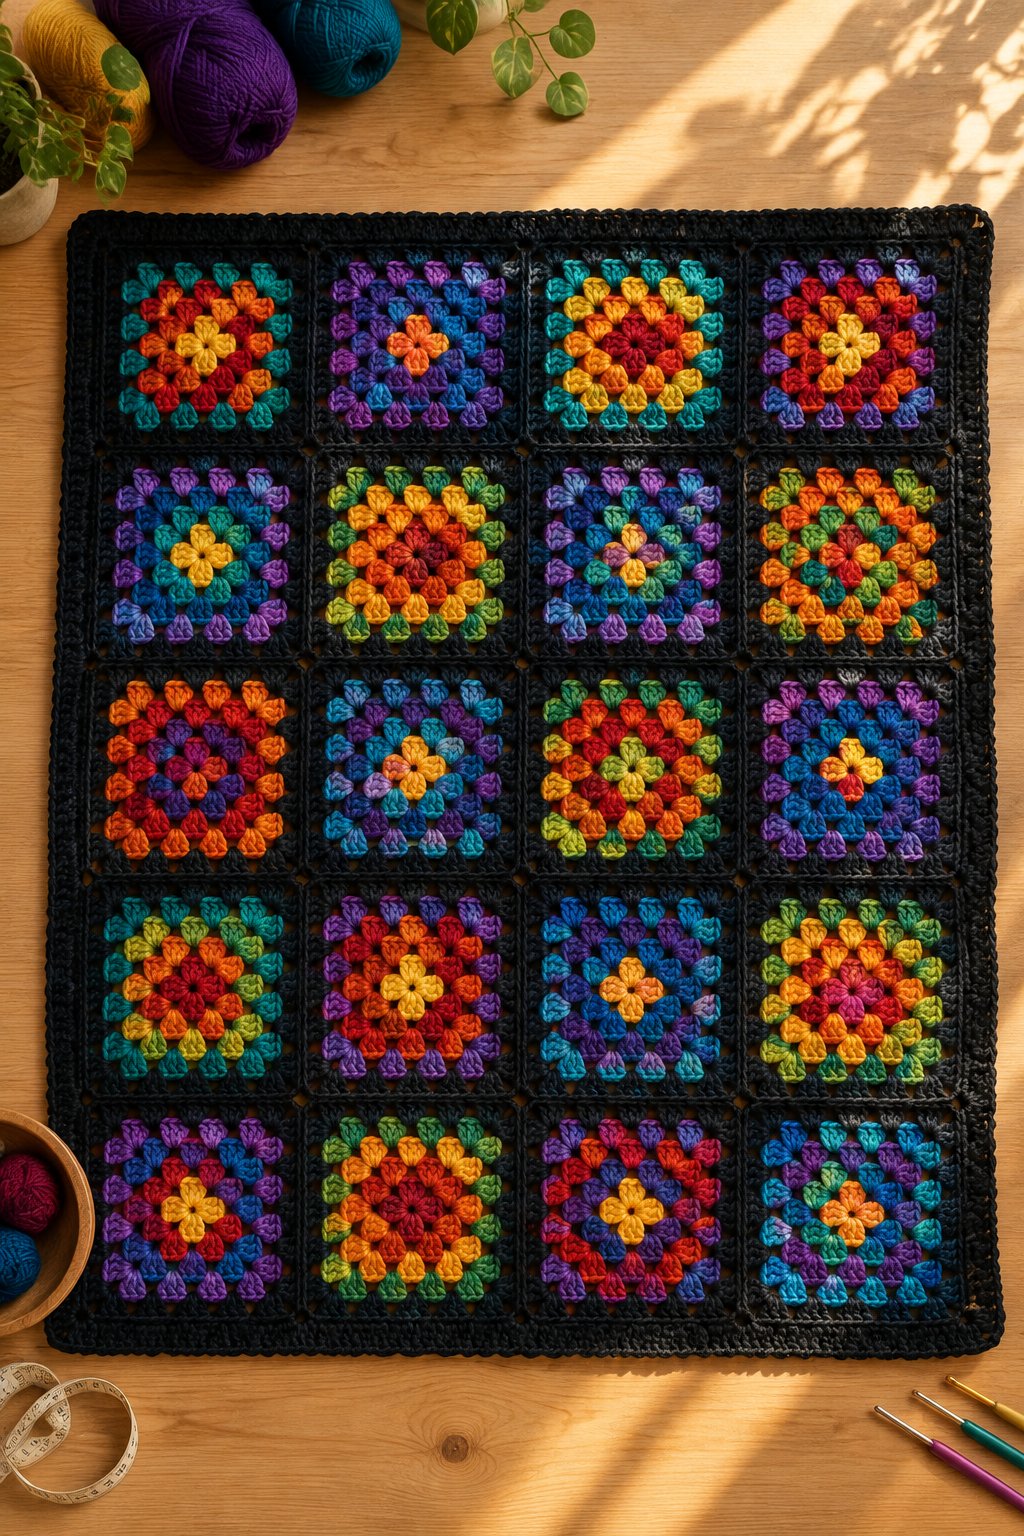
You achieve a stained-glass effect by framing bright sections of each square with dark outlines. Jewel tones such as sapphire and ruby stand out against charcoal, giving your throw a bold windowpane look.
Choose worsted-weight acrylic for an easy-care blanket, starting with a 5 mm hook. You’ll follow a motif pattern that separates colored areas with dark rounds or raised outlining stitches. Keep that outline color consistent throughout the project.
Your intermediate throw will look more balanced if you repeat a small set of bright shades. Place completed squares across the floor and check whether one color gathers too heavily in a corner. Join with the same dark yarn so the seams become part of the design. Reserve plenty of your outlining shade for assembly and edging, since those finishing steps use additional yarn across the entire blanket.
|
Detail |
Specification |
|---|---|
|
Yarn Weight |
Worsted, #4 acrylic |
|
Skill Level |
Intermediate |
|
Estimated Time |
About 30–45 hours |
10) Log Cabin Granny Square Lap Blanket

Your log cabin lap blanket builds a quilt-inspired design from a small center and growing strips of color. Put light shades along two neighboring sides and darker shades along the others for a clear diagonal effect.
Use worsted-weight acrylic with a 5 mm hook. You’ll add rows along selected sides of the center, following a log cabin granny pattern for the turning points. Mark the right side so your strip order stays consistent as the block grows.
This easy project gives you room to use leftover yarn of the same weight. Make four oversized blocks for a manageable lap blanket, rotating them before joining to test different arrangements. Keep each strip’s row count consistent across matching blocks. For a tidy edge, add a plain border after assembly and check that the corners lie flat before fastening off.
|
Detail |
Specification |
|---|---|
|
Yarn Weight |
Worsted, #4 |
|
Skill Level |
Easy |
|
Estimated Time |
About 15–24 hours |
11) Circle-In-A-Square Granny Coasters
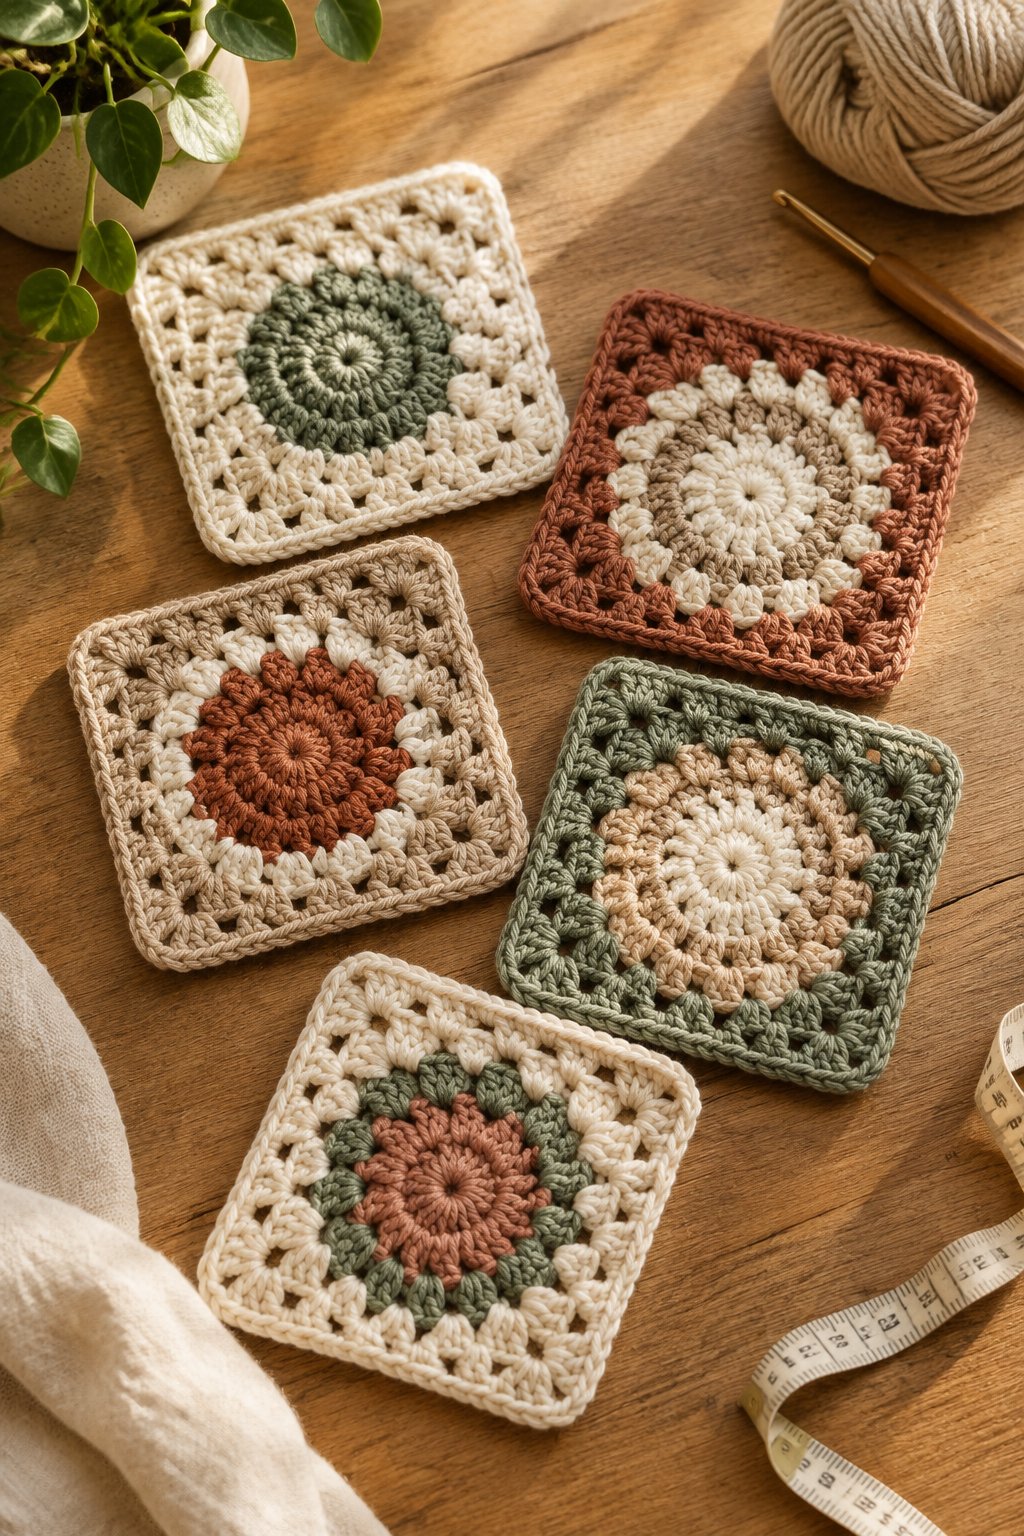
You get a quick, useful project with circle-in-a-square coasters that pair round centers with tidy corners. Try citrus-colored circles inside white borders, or match your centers to your favorite mugs.
Choose worsted-weight cotton with a 4 mm hook for absorbent, firm fabric. You’ll crochet a flat circle first, then use stitches of different heights to form the square. Keep the center closed enough to support a mug evenly.
This easy design makes a practical introduction to shaping beyond a traditional granny square. Aim for a finished width of about 4–5 inches, checking the size against your largest mug. Make a coordinated set of four for a small gift. Weave your ends through several stitches on the back, keeping any joins smooth so each coaster rests evenly. Wash and reshape the set before wrapping it.
|
Detail |
Specification |
|---|---|
|
Yarn Weight |
Worsted, #4 cotton |
|
Skill Level |
Easy |
|
Estimated Time |
About 2–4 hours per set |
12) Raised Cable Granny Square Pillow

Your raised cable pillow gives a familiar square format the rich texture of a cable-knit sweater. Choose cream or warm gray so the crossed stitches remain easy to see across the surface.
Use smooth worsted-weight yarn and begin with a 5 mm hook. You’ll work front-post stitches around earlier stitches, following a cable-square pattern for the crossing order. Practice one cable repeat first, since reaching behind skipped stitches takes some coordination.
This intermediate project suits a reading chair or a textured bedding arrangement. Expect the cable areas to pull inward, and measure your completed square before planning the cover. Pair a decorative front with a plain back to keep assembly manageable. When joining your squares, check that every cable runs in the intended direction. A narrow single-crochet edging gives you a stable seam around the pillow insert.
|
Detail |
Specification |
|---|---|
|
Yarn Weight |
Worsted, #4 |
|
Skill Level |
Intermediate |
|
Estimated Time |
About 10–16 hours |
13) Tulip Stitch Granny Square Market Bag

You bring a garden feel to your market bag with rows of tiny tulip shapes inside square borders. Use green for the stems and a single flower color against a pale background to keep the detail clear.
Choose worsted-weight cotton and a 4–4.5 mm hook. In a tulip-style square, you’ll combine stem stitches with clustered flower heads, following the pattern’s color changes. Keep the border firm enough to support the joining seams.
Your intermediate bag works well for lightweight shopping or carrying a small craft project. Build the lower panel with dense stitches to help contain smaller items. Make the straps wide enough to sit comfortably in your hand, and reinforce their bases with extra stitching. If you plan to carry heavier groceries, add a strong fabric lining and fabric-backed handles to support the crocheted outer layer.
|
Detail |
Specification |
|---|---|
|
Yarn Weight |
Worsted, #4 cotton |
|
Skill Level |
Intermediate |
|
Estimated Time |
About 10–16 hours |
14) Butterfly Granny Square Wall Hanging

Your butterfly wall hanging turns a few decorative squares into a light, cheerful accent. Set pastel wings against cream backgrounds, or choose vivid orange with dark details for a stronger focal point.
Use DK cotton with a 3.5–4 mm hook for clear stitch definition. You’ll follow a butterfly-centered square pattern or attach a separate butterfly to a plain square. For an easier version, choose flat appliqués with simple embroidered bodies.
This easy project suits a small entryway or craft corner. Arrange three squares vertically for a narrow hanging, then attach the upper edge evenly to a wooden dowel. Secure any raised wings along their attachment points so they keep their shape. Leave off long fringe if you prefer a clean finish. Hang your completed piece beyond the reach of young children, with the hanging cord firmly secured.
|
Detail |
Specification |
|---|---|
|
Yarn Weight |
DK, #3 cotton |
|
Skill Level |
Easy |
|
Estimated Time |
About 4–8 hours |
15) Skull Granny Square Halloween Throw

You give your Halloween throw a graphic finish by framing pale skull motifs with dark square borders. Black and ivory offer strong contrast, while deep plum adds a softer seasonal accent.
Choose worsted-weight acrylic and a 5 mm hook as a starting point. You’ll shape the eye openings and face with chains and grouped stitches, then build the surrounding square. Follow a skull-specific pattern carefully so both sides of the face stay balanced.
This intermediate project works as a seasonal couch throw or a gift for someone who enjoys spooky decor. Alternate skull squares with plain granny squares to give each face some breathing room. Check the eye openings after every motif, since a missed chain changes the expression. Use a pale joining yarn for a patchwork effect, or match the dark borders for a continuous background.
|
Detail |
Specification |
|---|---|
|
Yarn Weight |
Worsted, #4 acrylic |
|
Skill Level |
Intermediate |
|
Estimated Time |
About 25–40 hours |
16) Granny Square With A Three-Dimensional Rose Center

Your three-dimensional rose square adds layered petals that rise above a flat background. Pair dusty pink petals with sage leaves and an ivory border for a romantic, vintage-inspired finish.
Choose smooth DK yarn with a 4 mm hook, or move to worsted weight for a larger flower. You’ll build petals around the center or crochet a separate rose and sew it securely to the square. Use the construction method specified by your chosen pattern.
Treat this as an intermediate motif and start with a decorative cushion front. Position the roses where their raised shape will receive gentle use, since thick petals feel bumpy against your back. Anchor the flower through its base without flattening the outer layers. Before joining several squares, check that every rose faces upward and that the plain borders have matching stitch counts and dimensions.
|
Detail |
Specification |
|---|---|
|
Yarn Weight |
DK, #3; worsted optional |
|
Skill Level |
Intermediate |
|
Estimated Time |
About 1–2 hours per square |
Choose Yarn And Hooks For Your Project

You’ll get a more useful finished piece when you match your yarn’s fiber and thickness to its job. Choose your project first, then make one complete square before buying yarn for the full batch.
When Should You Choose Cotton, Worsted-Weight Acrylic, Or Chunky Yarn?
Choose cotton for coasters and structured bags where you want absorbency or clear stitches. Remember that cotton describes the fiber, while worsted describes thickness; you’ll find cotton in several yarn weights.
For washable blankets, worsted-weight acrylic gives you a broad color selection and manageable care. Check the label before choosing yarn for a gift, especially when machine washing is important.
Choose chunky yarn for oversized squares or a thick decorative cushion. Start around a 6–8 mm hook if the yarn label supports that range. Expect larger motifs and heavier seams, and measure a sample before using chunky yarn in a wearable project.
Which Hook Size Matches Your Yarn And Desired Drape?
Start with your pattern’s hook size and compare it with the yarn label. For many worsted-weight squares, a 4–5.5 mm hook provides a useful sampling range, but your tension determines the result.
Use a smaller hook when your sample feels too loose for a bag. Move up a size when your cardigan square feels stiff, then check its measurements again.
Judge the fabric after washing or blocking it as intended. Hold it up to assess its drape, and set it flat to check the corners. Record the hook size with your sample so you can return to the same setup later.
How Much Yarn Should You Buy?
Estimate your yarn from a completed sample square, then add separate allowances for joins and borders. Weigh your square on a digital scale and multiply that weight by the number of squares planned.
For example, if your square weighs 12 grams and you need 48 squares, your motifs require about 576 grams of that yarn. If the label lists 200 yards per 100 grams, that equals about 1,152 yards before finishing.
Add the yarn needed for your chosen joining method and edging, then include roughly 10–15% extra for variation. Track each color separately in multicolor designs. Buy matching dye lots when possible, especially for large areas of a single shade.
Keep Your Squares Flat And Consistent
You’ll make joining easier by checking stitch counts and measurements as you finish each square. Compare new motifs with your first approved sample so small changes stay easy to correct.
Why Are Your Squares Curling Or Ruffling?
Check your stitch count first when your square refuses to lie flat. Too few increases pull the fabric inward, while excess stitches create waves around the edge.
Compare each corner with the pattern, including its chain spaces. Tight center stitches also pull a square into a cup, so loosen your starting ring if the distortion begins in the middle.
Set the square down after each round to spot the first change in shape. If you find an incorrect increase, undo the affected round and remake it. Save blocking for gentle shaping after your stitch counts are correct.
How Do You Match Square Sizes Before Joining?
Measure your squares across the same points, using the outer edges of the sides rather than stretched corner tips. Keep your hook and yarn weight consistent throughout the batch.
If you’re mixing motif designs, aim for compatible edge stitch counts as well as matching dimensions. Two squares measuring 6 inches across still need a joining plan if their borders contain different numbers of stitches.
Use a cardboard template or blocking board to compare finished motifs. For a small size difference, gentle blocking helps. For a large difference, adjust the hook size or add a planned border round, then recheck the measurement before continuing.
Which Blocking Method Suits Your Fiber?
Follow your yarn label, then choose a blocking method that suits the fiber. Test your method on a spare square before treating a full project.
For washable cotton or wool, wet blocking gives you control over the shape. Soak as directed, press out water in a towel, and pin the square to size without stretching it tightly. Let it dry fully.
For acrylic, gentle steam blocking requires extra care because heat permanently changes the fibers. Keep the steamer or iron above the fabric, with no direct contact, and test the distance first. Use rustproof pins, and keep raised flowers or popcorn stitches from being pressed flat.
Turn Individual Squares Into Finished Projects
You turn a stack of motifs into a polished project by planning the layout and assembly before the last square is finished. Keep a written size plan beside your yarn so your border and joining choices stay consistent.
How Do You Calculate The Number Of Squares Needed?
Divide your target width by the finished square width, then repeat for the length. Use the measurement of a washed and blocked sample for the most useful estimate.
For a 40-by-50-inch blanket made with 5-inch squares, plan eight squares across and ten down, giving you 80 squares. This calculation excludes any extra width from raised seams or outer borders.
If you want a 2-inch border on every side, subtract 4 inches from each target dimension before calculating the square layout. Round to whole squares and adjust your finished dimensions as needed. For garments and shaped bags, follow a project schematic to account for openings and folds.
Which Joining Method Gives The Finish You Want?
Choose a join that supports the look and flexibility you want. Test it on two sample squares before assembling the full project.
Use mattress stitch for a discreet sewn seam, working through the loops specified by your pattern. Choose a slip-stitch join when you want a visible ridge, or a single-crochet join for a stronger raised outline.
Join-as-you-go suits compatible motifs with open outer rounds, letting you connect squares while making their final round. Keep the working yarn relaxed so the seam lies comfortably between motifs. Check your joined sample from both sides, then measure it to see how the seam affects your project’s width.
How Can You Plan Colors And Manage Yarn Ends?
Plan your color placement before joining, and secure ends as you finish each motif. This keeps your layout clear and reduces the finishing work left at the end.
Arrange your squares on a flat surface and take a reference photo. Check the layout in grayscale to see whether light and dark squares form unintended patches. Label rows with removable markers before stacking them.
Leave tails long enough to thread comfortably through a yarn needle, often about 6 inches. Weave through several stitches, reverse direction, and check the front for visible yarn. Secure each color change before trimming, then inspect the joins again after the project’s first wash.